Homeshift help
Most questions are answered by the help inside the app, step by step and in your language. For everything else, an e-mail is enough.
Getting started
Pack and record
Every box gets a number, a room and its contents. Quick entry understands “4 plates”, the camera recognises items in a photo, and packing suggestions match the room.
Print labels or stick on stickers
Print-ready labels with QR code, number and room as a PDF. Or bought QR stickers: the box is created when you scan.
Scan and find
One scan with the camera opens the box. Search finds every item and tells you which box it is in.
Guides
The same text as in the app under Settings → Help. Every topic explains what it is and tells you where to find it in the app.
Basics
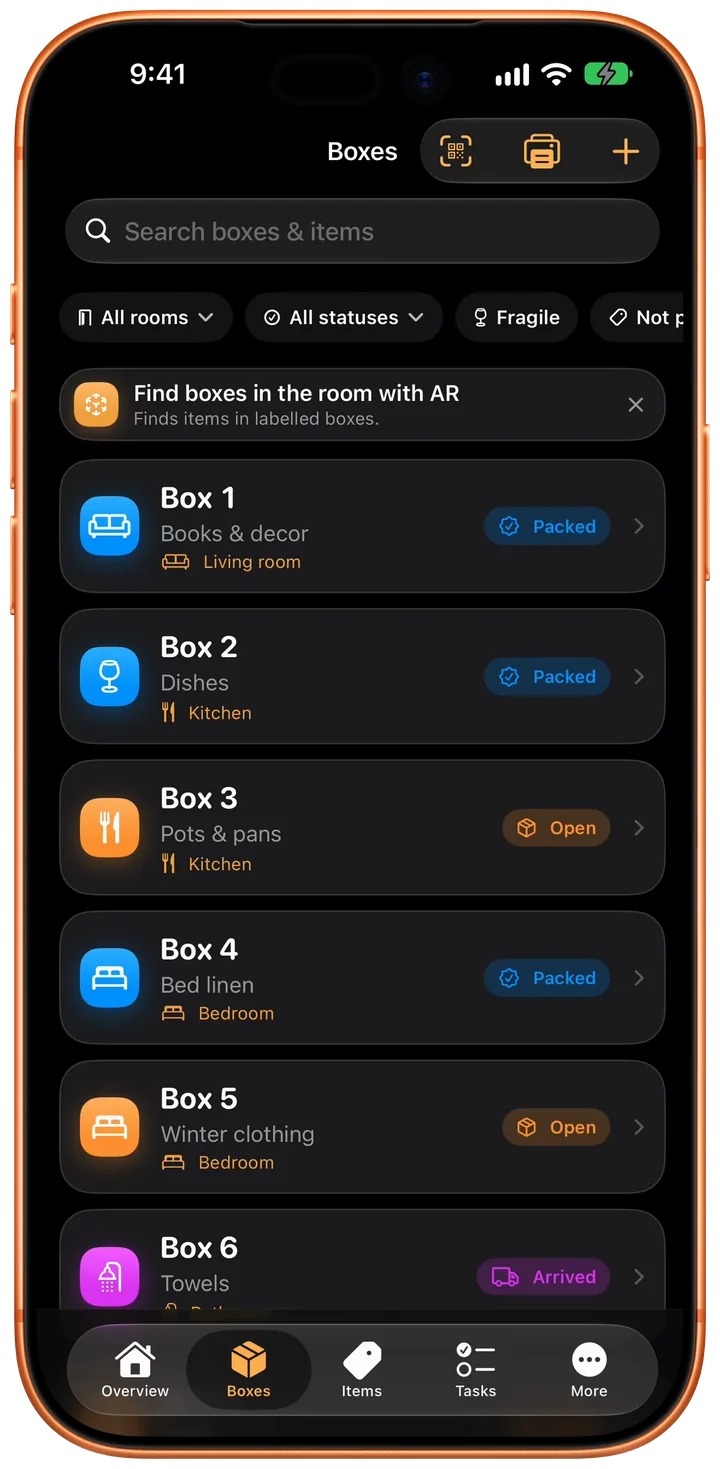
Boxes Every box has a number, a room and a status.
Every box automatically gets a number. You can also add a title, a room and notes. The status shows how far along the box is: Open, Packed, Arrived or Unpacked. You can mark fragile boxes so that they stand out on the label and in the list.
How to do it in the app
- Open the “Boxes” tab and tap “+” at the bottom.
- Choose a room or create a new one right here.
- Swipe right in the box list to advance the status.
Rooms Rooms sort boxes, furniture and defects by origin or destination.
You can name rooms freely, and every room has its own icon. On first launch Homeshift suggests the usual rooms. You can add more at any time. If you delete a room, its boxes are kept. They are simply no longer assigned to a room.
How to do it in the app
- More → Inventory → Rooms.
- Or create a new room directly while adding a box, a piece of furniture or a defect.
Items This is where you record what is in a box.
Items always belong to a box. Tap an item to edit its quantity, notes and any labels you choose. For quick entry, “4 plates” is enough. The quantity is recognized and the name is cleaned up.
How to do it in the app
- Open a box, tap the input field at the bottom.
- Enter a name and press Return. The field stays open for the next item.
- Tap the row to edit it, or swipe left to delete it.
Capture faster
Photo recognition & suggestions Photograph the contents instead of typing them in.
Above the input field in a box there are two shortcuts. The camera photographs the contents of the box and suggests the recognized items as tappable chips. The sparkle icon next to it suggests typical items for the room of the box, even without a photo.
Both run entirely on the device. No image and no text leaves your iPhone. On devices with Apple Intelligence the suggestions get more natural names; without Apple Intelligence the app uses a built-in list. Recognition is a help, not a perfect list. You decide what is added.
How to do it in the app
- Open a box → camera icon above the input line.
- Take a photo and then tap individual suggestions or “Add all”.
- For suggestions without a photo, tap the sparkle icon next to it.
Scan text & labels Read labels with the camera.
The live scanner recognizes text with the camera. Tap a recognized word in the camera image and it is added as an item. This is useful for boxes that are already labeled, or for product labels. The menu entry only appears on devices that support the live scanner.
How to do it in the app
- Open a box → “…” menu → “Scan text/label”.
Box title from the contents Homeshift suggests a short title based on the items you recorded.
As soon as a box has contents, Homeshift can suggest a short title, for example “Kitchen: plates, cups, pots +2 more”. With Apple Intelligence this becomes a shorter term such as “Kitchenware”. The suggestion is entered in the title field, and you can still change it before saving.
How to do it in the app
- Open a box → “…” menu → “Edit”.
- In the title field, tap “Summarize from contents”.
Siri, Spotlight and Lock Screen Ask questions and pack without opening the app.
While packing and unpacking you rarely have a hand free. That is why you can also use Homeshift through Siri: Siri tells you which box something is in, marks a box as packed, puts an item into a box or reads out your next tasks.
Search on the Home Screen also finds boxes by their contents. If you type “kettle”, the box opens directly. On moving day you can turn on a live view on the Lock Screen. It shows how many boxes have already arrived at the new home, and it ends by itself once the last box is there.
How to do it in the app
- “Hey Siri, what is due in Homeshift?” or “Where is my thing in Homeshift”.
- Swipe down on the Home Screen and search for an item.
- On moving day, tap “Live view” on the overview.
Organize
Tasks Your tasks in three columns: Backlog, Active and Done.
The tasks are split into three sections. Tap the circle and the task is done. Tap the row and you can edit the due date and who is responsible.
How to do it in the app
- “Tasks” tab → “+”.
- Set a due date so that the task appears in the countdown.
Furniture Large pieces and what should happen to them.
You record furniture separately from the boxes. For each piece you decide what should happen to it: take it with you, sell it or dispose of it. That way you know before moving day what is actually coming along.
How to do it in the app
- More → Inventory → Furniture.
Storage For the cellar, attic and storage unit: everything that does not move with you.
Storage is kept separate from the moving boxes. An area (the cellar, for example) contains spots (Shelf A, for example), and a spot contains boxes with their items. You can put a moving box into storage. Its items and photos come along, and the moving box is archived. Taking it out does the opposite.
How to do it in the app
- More → Inventory → Storage.
- Put a box in storage: open the box → “…” menu → “Put in storage”.
- You can import larger lists as CSV (name,quantity,unit,notes).
Defect report Document damage and hand it over as a PDF.
Record damage with severity, status, room, location, description and photos. With “Export as PDF” you create a printable report of all recorded defects. That is the usual proof when moving in and out.
How to do it in the app
- More → Planning → Defect report.
- Take photos right in the defect or pick them from the library.
Handover record Meter readings, keys, defects and a signature, as a PDF.
A handover record documents the condition a property was handed over in: address, date and the people involved, the meter readings, the keys handed over, the defects from the defect report and the photos that go with them. When you move out, it protects your deposit. When you move in, it protects you from accusations that only come up at the next move-out. As a PDF with signature lines it is the document that both sides sign.
You enter the values of your items, furniture and storage things in their respective forms. The “Inventory” export adds them up per room. That is the basis for your contents insurance.
How to do it in the app
- Defects → Handover records → “+”: move-out or move-in.
- Enter the meter readings and keys, take photos, and set “Signed” once both sides have signed.
- “As a PDF” creates the document with signature lines, on A4 or Letter depending on the country of the move.
Printing & exporting
Home inventory & next move What is in storage, what it is worth and how you carry it into your next move.
Storage is what stays once the move is over. “Home inventory” turns it into the list that contents insurance asks for after a loss: what is in which area, with the current value of each item and a total per area, as a PDF or as a table.
When you move again, you don't have to record the cellar a second time. “Carry storage into a new move” copies areas, spots, boxes and contents into a new move. The previous move is kept as an archive, so you can still prove the handover and any defects later. Sticker codes and photos stay with the old move, because a sticker always belongs to just one box.
How to do it in the app
- Storage → “…” menu → “Home inventory”.
- You enter the value on the individual item. Without a value, it is not included in any total.
- “Carry storage into a new move” creates the next move and copies everything into it.
Print box labels QR stickers that open the box in the app.
Every box has a printable label with a QR code, number, title and room. If you scan the QR code, the box opens directly in Homeshift. When unpacking you can see what is inside without cutting the box open.
How to do it in the app
- All at once: box list → printer icon.
- One at a time: open the box → “…” menu → “Print label”.
- Before printing you can choose what goes on the label.
- Finding boxes again: box list or room → “AR mode”. What is in the box appears above every label.
Bought QR stickers The stickers are already on the boxes. The box is created in the app when you scan one.
Bought QR stickers work the other way round from printed labels. With a label you create the box in the app first and print the label afterwards. With a bought sticker the code is already on the box. You walk through the flat with the camera, and every sticker you scan becomes a new box with the next number.
Every sticker has a unique code that says nothing about the contents. It only belongs to a box once you link it. If you scan a sticker that has not been used yet, Homeshift asks whether it should become a new box or belongs to an existing one.
You can detach a sticker from a box at any time and assign it to another one. If the same code ends up on two boxes by mistake, the app tells you when scanning. You then decide which box keeps the code.
You can mix bought stickers and labels you printed yourself. Both open the box in the app, even if you scan them with the normal Camera app.
How to do it in the app
- Whole roll: box list → “…” menu → “Create boxes from stickers”.
- One at a time onto an existing box: open the box → “Link a QR sticker”.
- If the QR code is unreadable, tap “Type the code”. The code is printed as text next to the QR image.
- Detach a sticker: open the box → press and hold the sticker → “Remove sticker”.
Export PDF manifest, CSV spreadsheet or JSON archive.
There are three formats, all created directly on the device: a PDF with the inventory by room, a CSV table of all items for Excel or Numbers, and a JSON archive as a complete copy of your data, secured with a checksum. Export is never restricted.
How to do it in the app
- More → Move → Export → choose the format → check the preview → Share.
Data & privacy
Where is my data? Your data is on this device. It needs no sign-in and no server.
By default everything stays on this iPhone. There is no account, no login and no server reading along. Photo recognition and the suggestions also run on the device.
Private iCloud backup A copy in your own iCloud account.
“Private iCloud” additionally saves a copy to your own iCloud account, including photos, in case you switch or lose the device. This is not sharing with other people, only a private backup. You can turn it off at any time.
How to do it in the app
- Settings → Backup & storage → “Private iCloud”.
Homeshift Cloud The same move on several devices, together with helpers.
You can put a move into the cloud. It is then the same on all your devices, and you can invite helpers by link or QR code, either as an editor or as a viewer. Only you as the owner pay for it. Anyone helping needs nothing but the app.
The cloud is optional and applies per move. Whatever you don't explicitly put into the cloud stays on the device. Photos are only transferred if you switch on “Send photos along”, and they are deleted again after the exchange. With “Stop sharing” you get everything back, and the move continues locally.
How to do it in the app
- More → Sign in.
- “Share move” → put it into the cloud.
- Create an invitation link and pass it on.
Purchases & unlocks
The three modules Pay once, unlocked for good.
Homeshift sells three modules, each on its own and without a subscription:
“Unlimited” lifts the limits on boxes, items, photos and storage, and lets you keep several of your own moves side by side.
“Scanning” unlocks the camera features: set the status of many boxes in one pass, find boxes in the room with AR, capture labels and text as items, and recognize items in a photo. This applies to the move and to storage.
“Planning” contains the task plan from the moving date, reminders, the calendar entry and the packing suggestions.
If you want all three, take “Homeshift Complete”. It is the same thing, but cheaper than buying them separately. All one-time purchases apply to the whole Family Sharing group: one person buys, the whole household uses it.
How to do it in the app
- More → Unlock.
What stays free The limits only apply to new entries. Nothing is lost.
Without buying anything, one move of your own, 15 boxes, 100 items, 15 photos plus 15 storage boxes and 100 items in storage are free.
When you reach a limit, you simply cannot create any **new** entries. Nothing is deleted or hidden, and you can still export everything, even if you never buy anything or let a subscription lapse. Labels, QR codes, the defect report and the export are never blocked by a purchase.
Moves where you only help out do not count towards your limits.
How to do it in the app
- Under Settings → About Homeshift → Scope you can see where you stand.
Cloud subscription The cloud is the only part of Homeshift with running costs, because it needs a server.
Sharing and syncing between devices needs a server, and that costs money every month. That is why the cloud is only available by subscription, monthly or yearly, with the first seven days free. The subscription also includes all three modules.
When the subscription ends, only the sharing ends. One-time purchases are kept, and the move continues locally, because your data is on the device anyway. You cancel through your Apple ID, not in Homeshift.
Frequently asked questions
Do I need an account?
No. Boxes, items, photos, tasks, furniture, storage and defects all work without an account and without internet. You only need an account if you want to share a move with others.
What does Homeshift cost?
The app is free. The three modules are bought once; Homeshift Cloud for sharing is a subscription with a 7-day trial. Where a free limit applies, the app says so right there; the app shows the prices under Settings → Unlock.
Where is my data?
On your device. The private iCloud backup keeps a copy in your own iCloud account, which we cannot access. Only a move you deliberately put into Homeshift Cloud lives on our server, in Europe and with automatic expiry.
How do I share a move?
Settings → This move → Share move. Sign in with Apple or Google, put the move into the cloud and invite people by link or QR code. Helpers do not need a subscription.
I have a new iPhone. How does my data come along?
Three ways: the private iCloud backup (the app fetches it on first launch), a shared move in Homeshift Cloud (Settings → Moves → fetch from the cloud), or the JSON archive from the export, which you import into the new installation.
How do I print labels?
Boxes → menu → Print labels. You choose what goes on the label and get all labels as a PDF. Bought QR stickers are linked to a box by scanning instead.
The QR code does not open the app.
A printed label or a sticker opens Homeshift from the Camera app when the app is installed. Without the app the code leads to this website with the way to the App Store. If the camera stays silent, the scanner inside the app helps: Boxes → Scan.
How do I cancel the subscription?
In your Apple Account settings under Subscriptions, like any other App Store subscription. The cancellation takes effect at the end of the current period; the move's data stays on your device.
How do I delete my account?
Settings → Homeshift account → Delete account. That removes your cloud data and your sign-in identity in one step. The moves on your device stay.
Which languages is Homeshift available in?
Homeshift follows the language of your device. The languages the app speaks are listed on its App Store page.
Is there Homeshift for Android or the Mac?
No. Homeshift is available for iPhone and iPad.
Restore purchases
Purchases can be restored on any device with the same Apple ID: Settings → Unlock → Restore Purchases.
Contact
Write to us in your language. We usually reply within two working days.